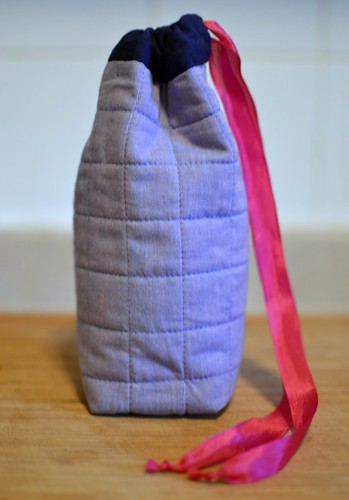
This afternoon I spent some quality time with the sewing machine, making a little bag for a lens that didn't have one. It was a pretty good time—with some fun hand-finishing details for extra cushioning and sharpness of appearance—so I'll share! Also illustrated: the drama of the shift from late-afternoon to early-evening light through my apartment's west-facing window.
You'll need:
- an item that needs a cushiony bag to keep it safe
- a measuring tape or ruler
- fabric for the shell, lining, and drawstring casing: I used shot cotton scraps
- batting
- a marking tool for drawing quilting lines
- something to use as a drawstring—a length of cord, a ribbon, hot pink seam binding ribbon?
- matching threads
- pins
- a hand sewing needle
- sewing machine
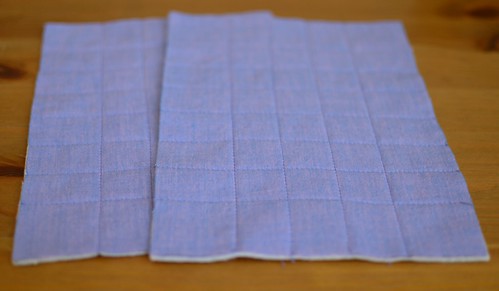
Measure the diameter and length of your object. Add 3" to the length measurement for seam allowances and space for gathers. Divide the diameter measurement in half, and add 1" for seam allowances and at least 1/2" for ease (add more for a looser bag). Make a note of the resulting numbers—mine were 8" length and 6" width. Cut two pieces each of shell fabric and lining to these dimensions. Cut two pieces of batting slightly larger.
Set aside the lining pieces for now. Smooth each shell rectangle against a batting rectangle. Mark quilting lines on it with a hera marker or fabric marker (if you have neither, use the needle you use for weaving in ends from knitting projects to draw creases).

I quilted a 1" grid, leaving an extra 1/2" all around for seam allowances.
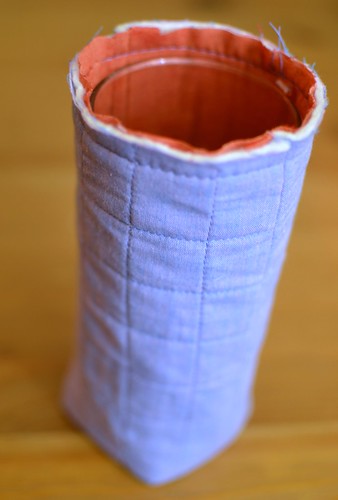
Cut off the excess batting around the edges of the shell fabric rectangles. Put them right sides together and sew up the bottom and sides at 1/2".
To form the bottom of the bag, fold it so that one side seam is aligned with the bottom seam. Measure 1-1/4" from the point and sew a straight line across. Trim off the point 1/4" from the new seam. Repeat for the other side. (The depth of the bag will depend on how far these seams are from the corner—estimate where you'll want to sew, pin it, and check that you're satisfied with the shape of the bottom before sewing these seams.)
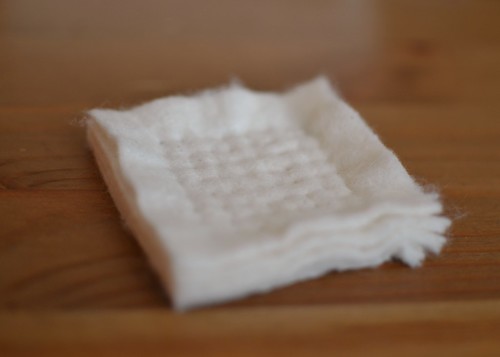
To make the padding for the bottom of the bag, measure the bag bottom and cut 4–6 squares of batting slightly larger than it. Arrange them in a stack and sew them together with a fairly closely-spaced grid of prick stitches. The goal is to make the batting stack into a firm square of padding about 1/2" thick; the neatness of your prick stitching is immaterial as it'll be completely hidden in the finished bag.
Once the padded square is finished, tack it to the inside bottom of the shell, and turn it right side out.
To make the lining, place the lining rectangles right sides together and sew around the sides and bottom at 1/2". Form the bottom of the lining the same way as for the shell. Slip the lining into the shell and trim the raw edges at the top to match. Baste them together at 3/8", easing the lining to fit, then sew them together at 1/2".
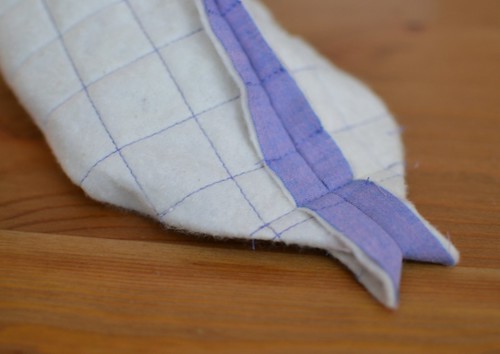
To make the drawstring casing, measure the diameter of the bag and cut a piece of fabric 2" wide x that measurement + 1". Fold the short ends in 1/2" and press; fold one long edge in 1/2" and press again. Edgestitch close to the fold along each short end.
Attach the drawstring casing to the bag by pinning the unfolded edge to the edge of the bag, right sides together. Stitch at 1/2", then trim the seam allowance to 1/4".
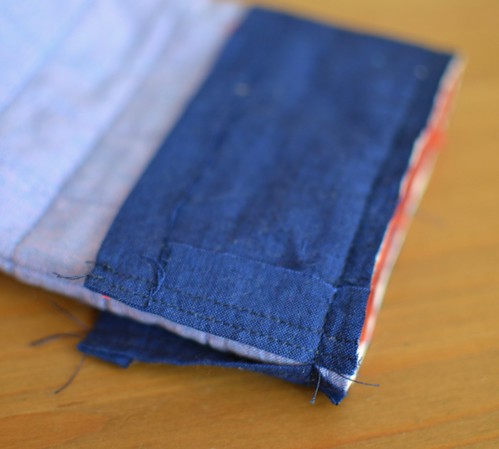
Cover the raw edge of the bag where the drawstring casing will open by cutting a piece of the drawstring casing fabric 1" x 1.5". Fold in half lengthwise and press, unfold and fold the long edges toward the centre and press again, then fold in half again along your original fold line (like making double-fold bias tape, but with fabric cut on the straight of grain.) Pin the folded piece around the raw edge where the casing ends meet and slip stitch in place, first on the outside of the bag and then on the inside.

Finish the casing by folding it to the inside and slip stitching the folded edge to the lining. Finish the ends of the drawstring as you prefer. Attach a safety pin to one end of the drawstring and thread it through the casing.
Hooray!
2 comments:
Merit Badge did an amazing job creating my bespoke enamel badges. From the very start, they were helpful, guiding me through the design process and making great suggestions. The final product was even better than I expected, with rich colours and a smooth finish. The badges arrived on time, and the quality is outstanding. They are perfect for our upcoming event, and everyone loves them. I’m so glad I found Merit Badge, as they make the whole process stress-free. If you need top-quality bespoke enamel badges, this is the company to trust for great service and results.
The carbide end mill store is your one-stop destination for premium machining tools. CGS Tool offers a wide selection of carbide end mills designed for durability, precision, and performance, making it easier for professionals to find the right tools for their projects.
Post a Comment