The last week has been the first properly
autumny week there's been in my city so far, and I am totally thrilled. It's jacket weather! wool sock weather! scarf weather! bread-baking weather! impending glove and mitten weather! knitting with wool without intolerable sweatiness weather!
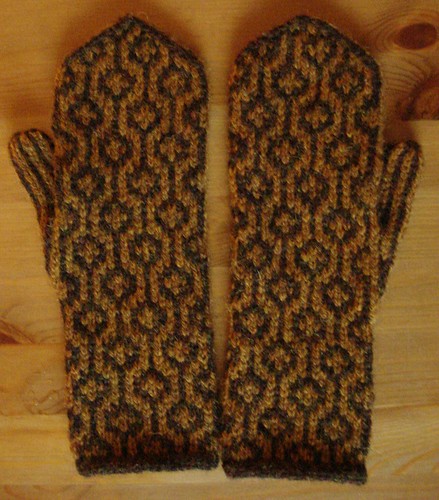
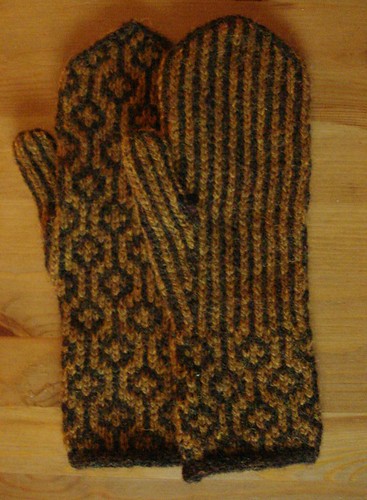
To celebrate I made a pair of mittens, and they're for you, internet.
I watched
Lynne and Gayle's Hexalong all summer with a lot of interest, because I love hexagons!
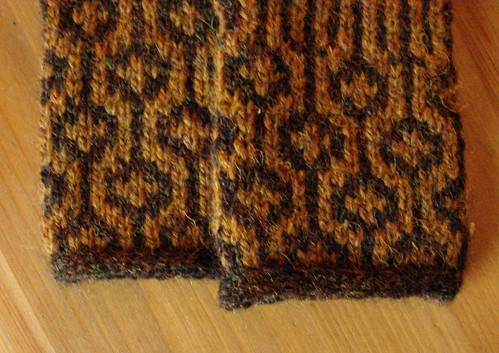
love them! I haven't been able to muster the dedication necessary for making an entire hexagon anything, but I did come up with a little stranded colourwork pattern with hexagons in it, and turned it into mittens. I have christened these Puzzle Stripe Mittens because the hexagons are made out of wiggling lines that look a bit interlocking/confusing/puzzle-like at first. Once the pattern is established, though, it's pretty easy to follow, and there are no areas where you'll need to make a long float behind the work that will catch your fingers when you try to put a mitten on. The palms and thumbs are patterns with narrow stripes for quickness of knitting and fun-ness of contrast with the backs of the hands.
The yarn I used was
Jamieson's Heather Aran in Burnt Umber (CC) and Grouse (MC). The skeins were 100 yards and one of each colour produced a pair of mittens, but there wasn't a lot left over. To substitute a comparable yarn, be on the lookout for a heavy worsted weight that is lofty and crisp.
As written this pattern will produce a pair of mittens that measure 7.5" in circumference above the thumb. (The wrists are slightly smaller around for a closer fit despite the lack of ribbing.) This is smallish, but if you choose a puffy-sproingy-squishy yarn like I did and keep a loose tension when stranding the unused colour behind the work, this size is reasonably accommodating. (My hands are 7.5" around above the thumb, and the mittens feel nice with no ease.) Slightly smaller yarn and needles (like a regular worsted weight with 3.5mm needles) would size them down handily; try slightly bigger yarn and needles (Knit Picks City Tweed HW and 4.5mm needles would be excellent). The lengths of the cuff, hand, and thumb are easily adjusted on the fly; try the mitten on periodically to make sure you're on the right track.
Onward!
Materials- 100 yards aran-weight yarn in each of two contrasting colours (shown in Jamieson's Heather Aran in Grouse and Burnt Umber, 1 skein each)
- 4mm and 4.5mm double-pointed needles
- 4 stitch markers
- scrap yarn
- tapestry needle
Gauge20 sts and 22 rnds = 4" in Palm patt
Finished size7.5" hand circumference, measured above the thumb. Hand and thumb lengths are adjustable.
NotesThe mittens begin with a length of I-cord that forms the edge of the cuff. Work 4-st I-cord over 4 sts on double-pointed needles as follows:
Row 1: K4, do not turn. Slide sts to opposite end of double-pointed needle.
Repeat this row to make 4-st I-cord.
(For a video of this technique, see
this page on knittinghelp.com.)
Required skillsAbbreviationsk: knit
rnd: round
st: stitch
ssk: slip two stitches separately and knitwise, insert the left needle through both of them, and knit them together (1 stitch decreased)
k2tog: knit two together (1 stitch decreased)
sk2p: slip 1 stitch purlwise, k2tog, and pass the slipped stitch over (2 stitches decreased)
MC: main colour
CC: contrasting colour
CO: cast on
beg: beginning
foll: following
pm: place marker
rem: remaining
ChartsKey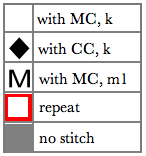 Cuff
Cuff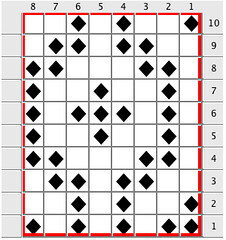 Hand
Hand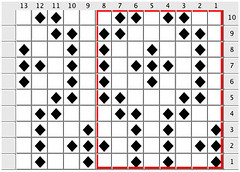 Palm
Palm Gusset
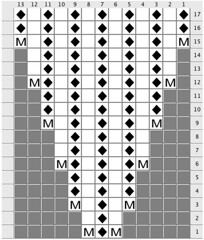 Thumb
Thumb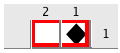 Right mittenCuff
With larger needles and MC, provisionally CO 4 sts. Work 4-st I-cord for 40 rows. Do not break yarn. Place 4 live sts on hold.
Switch to smaller needles. With working yarn still attached, pick up and k 1 st in each row of I-cord along its length, taking care not to twist the cord. 40 sts picked up. Divide sts between needles for working in the rnd and join. Mark or note beg of rnd.
Beg foll Cuff chart, working the 8-st repeat 5 times each rnd. Continue until 19 rnds of patt have been worked.
GussetNext rnd: Work Hand chart over first 21 sts in rnd, pm, work Palm chart over rem 19 sts.
Continue as established for 2 more rnds.
Next rnd: Work in established Hand patt to first marker, work next 2 sts in established Palm patt, place first gusset marker, work rnd 1 of Gusset chart, place second gusset marker, work to end of rnd in established Palm patt.
Continue to work patts as established until all rnds of Gusset chart have been completed.
Next rnd: Work in established patts to first gusset marker, remove marker, sl next 13 sts to scrap yarn, remove next marker, CO 3 sts using the backwards loop method, work to end of rnd in established patt. 42 sts.
HandNext rnd: Work in Hand patt to marker, work in Palm patt to end of rnd.
Continue as established until work measures 3.75" from the CO edge above the thumbhole, or until the mitten just covers the tip of the little finger when tried on.
Next rnd: With MC, ssk; work in established patt to 2 sts before marker; with MC, k2tog; with CC, k1; with MC, ssk; work in established patt to last 3 sts in rnd; with MC, k2tog; with CC, k1. 4 sts decreased.
Repeat last rnd until 10 sts rem.
Next rnd: With MC, ssk; work in established patt for 1 st; with MC, k2tog; with CC, k1; with MC, sk2p; with CC, k1.
Next rnd: With MC, sk2p. Break off both colours. Thread MC through rem sts, pull tight, and fasten off.
ThumbTransfer 13 thumb gusset sts on hold to needles. Join both colours. Work across 13 sts in Palm patt. With MC, pick up and k 3 sts from CO edge of hand. Mark or note beg of rnd. 16 sts.
Next rnd: Work in Thumb patt.
Continue until thumb measures 2", or desired finished length. Break off CC.
Next rnd: With MC, k2tog around. 8 sts rem.
Break yarn, thread it through rem sts, and fasten off.
Left mittenWork cuff as for right mitten.
GussetNext rnd: Work Hand chart over first 21 sts in rnd, pm, work Palm chart over rem 19 sts.
Continue as established for 2 more rnds.
Next rnd: Work in established Hand patt to first marker, work to last 3 sts of rnd in established Palm patt, place first gusset marker, work rnd 1 of Gusset chart, place second gusset marker, work to end of rnd in established Palm patt.
Continue to work patts as established until all rnds of Gusset chart have been completed.
Next rnd: Work in established patts to first gusset marker, remove marker, sl next 13 sts to scrap yarn, remove next marker, CO 3 sts using the backwards loop method, work to end of rnd in established patt. 42 sts.
Work hand and thumb as for right mitten.
FinishingCarefully undo the provisional CO from each cuff, transferring sts to a needle as they become live. Transfer 4 sts on hold to another needle. Graft the two sets of 4 sts together, taking care to match tension as closely as possible. Weave in all ends, but don't cut them off yet. Use the ends at the base of the thumb to mend any holes in the area if necessary. Block mittens by soaking in lukewarm water, squeezing out excess water in a towel, and laying flat to dry. When mittens are completely dry, cut off the woven-in ends.