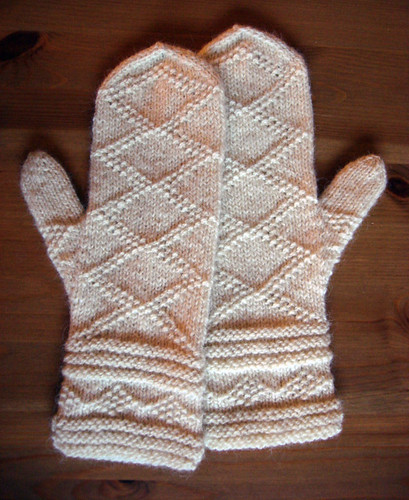
These mittens were basically an extended swatching exercise for a future sweater, so I am releasing the pattern into the wild.
Because of the sweater idea I have in mind, they have some features that I think of as associated with a gansey—split hems, patterned gussets, and areas with different patterns set off by horizontal welts. (My impressions of what a gansey is like are not extensively researched—basically I am remembering thumbing through Alice Starmore's Fisherman's Sweaters.)
The yarn I chose is a very lanolin-rich worsted weight Cotswold wool that I got from The Loop, so these are probably the most practical mittens I will ever make. It's a little on the coarse side, so I don't think they'll wear out any time soon. I'd recommend choosing a crisp worsted weight wool if you want to substitute a comparable yarn; something like Briggs & Little Heritage would be great, or Debbie Bliss Donegal Aran Tweed.
I love how the purl stitches stand out against their stockinette background:
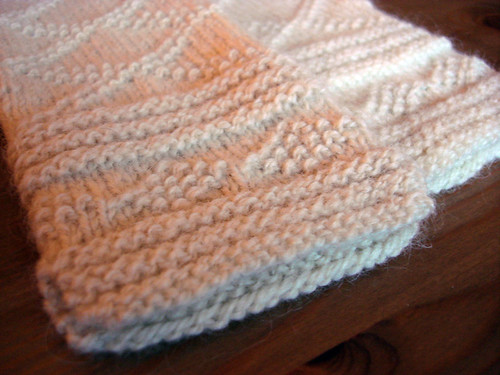
(I committed a terrible indiscretion, though—for swatching purposes I was curious about what the knitted fabric would be like if it were scoured, so I scoured the finished mittens like you'd scour a fleece. Answer: it's totally awesome, but in a different way than the greasy fabric was awesome. It is a little bit softer now, and glossier, and the stitches are more even now than before. This is all very useful to know!)
These mittens are named what they are because of the circumstances under which I decided that it was important to have more mittens immediately. My partner and I recently visited Halifax (home of The Loop) for a weekend. I used to live there, but have apparently been away for long enough that I forgot how cold it gets when it rains. On the Saturday we were there I went yarn-shopping and then started walking up the hill to visit a friend... but it was pouring rain, and poor bedraggled me with no umbrella, and every time I reached up to brush water out of my eyes, water from my hands would run up the sleeves of my jacket, and it was a freezing cold disaster. I was waiting for a light to change beside the Citadel when I stopped thinking about how awesome it would be to knit something out of this yarn, and started wishing fervently that someone had already made it into mittens for me.
Anyway! All of the pattern elements are charted, with written directions following each chart. It looks like a lot of pattern to keep track of, but it's all very easy to follow once you get going. I hope you like knitting mittens as much as I do!
Gauge
20 stitches and 30 rounds to 4", in stocking stitch.
Finished size
8" in diameter, and 11.5" from cuff to tip.
Skills required
- casting on with the long-tail and backwards loop methods
- knitting and purling
- M1 increase
- decreases: knitting two together (k2tog), ssk, and slip 1, k2tog, pass slipped stitch over (sk2p)
- knitting in the round
- picking up and knitting stitches
Yarn and notions
- 1 skein Lange's Rock Farm Cotswold (100% wool; 200m per 4oz skein)
- 4mm double-pointed needles, set of 5
- one stitch holder or oddment of yarn to hold the thumb stitches
- stitch markers
- a darning needle
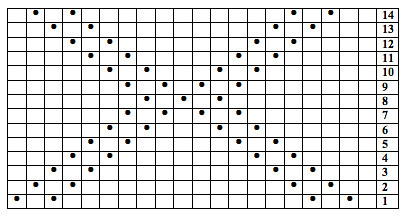
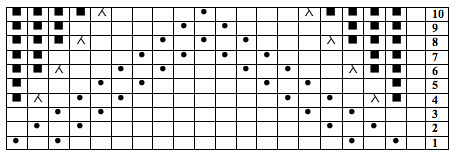
Charts and written directions
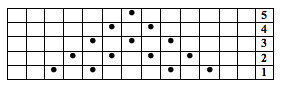
First things first, a key to the charts:

Cuff:

Round 1: K4, p1, k3.
Round 2: K3, p1, k1, p1, k2.
Round 3: K2, p1, k1, p1, k1, p1, k1.
Round 4: (K1, p1) four times.
Round 5: K2, p1, k1, p1, k1, p1, k1.
Round 6: K3, p1, k1, p1, k2.
Round 7: K4, p1, k3.
Hand:
Round 1: K1, p1, k1, p1, k13, p1, k1, p1.
Round 2: K2, p1, k1, p1, k11, p1, k1, p1, k1.
Round 3: K3, p1, k1, p1, k9, p1, k1, p1, k2.
Round 4: K4, p1, k1, p1, k7, p1, k1, p1, k3.
Round 5: K5, p1, k1, p1, k5, p1, k1, p1, k4.
Round 6: K6, p1, k1, p1, k3, p1, k1, p1, k5.
Round 7: K7, p1, k1, p1, k1, p1, k1, p1, k6.
Round 8: K8, p1, k1, p1, k1, p1, k7.
Round 9: K7, p1, k1, p1, k1, p1, k1, p1, k6.
Round 10: K6, p1, k1, p1, k3, p1, k1, p1, k5.
Round 11: K5, p1, k1, p1, k5, p1, k1, p1, k4.
Round 12: K4, p1, k1, p1, k7, p1, k1, p1, k3.
Round 13: K3, p1, k1, p1, k9, p1, k1, p1, k2.
Round 14: K2, p1, k1, p1, k11, p1, k1, p1, k1.
Gusset:

Round 1: M1, k1, m1.
Round 2: K.
Round 3: K.
Round 4: M1, k3, m1.
Round 5: K.
Round 6: K.
Round 7: M1, k2, p1, k2, m1.
Round 8: K2, p1, k1, p1, k2.
Round 9: K3, p1, k3.
Round 10: M1, k2, p1, k1, p1, k2, m1.
Round 11: K2, p1, k3, p1, k2.
Round 12: K3, p1, k1, p1, k3.
Round 13: M1, k4, p1, k4, m1.
Round 14: K4, p1, k1, p1, k4.
Round 15: K3, p1, k1, p1, k1, p1, k3.
Round 16: M1, k2, p1, k1, p1, k1, p1, k1, p1, k2, m1.
Round 17: K2, p1, k2, p1, k3, p1, k1, p1, k2.
Round 18: K1, p1, k1, p1, k5, p1, k1, p1, k1.
Tip:
Round 1: K1, p1, k1, p1, k13, p1, k1, p1.
Round 2: K2, p1, k1, p1, k11, p1, k1, p1, k1.
Round 3: K3, p1, k1, p1, k9, p1, k1, p1, k2.
Round 4: K1, ssk, k1, p1, k1, p1, k7, p1, k1, p1, k1, k2tog.
Round 5: K4, p1, k1, p1, k5, p1, k1, p1, k3.
Round 6: K1, ssk, k2, p1, k1, p1, k3, p1, k1, p1, k2, k2tog.
Round 7: K5, p1, k1, p1, k1, p1, k1, p1, k4.
Round 8: K1, ssk, k3, p1, k1, p1, k1, p1, k3, k2tog.
Round 9: K6, p1, k1, p1, k5.
Round 10: K1, ssk, k4, p1, k4, k2tog.
Thumb:
Round 1: K2, p1, k1, p1, k3, p1, k1, p1, k2.
Round 2: K3, p1, k1, p1, k1, p1, k1, p1, k3.
Round 3: K4, p1, k1, p1, k1, p1, k4.
Round 4: K5, p1, k1, p1, k5.
Round 5: K6, p1, k6.
Right mitten
Cuff edge (work 2 alike, knitting back and forth)
Cast on 20 sts using the long-tail method. Purl 2 rows. Knit 2 rows. Purl 2 rows. Knit 2 rows. Purl 1 row. (This creates horizontal welts of stockinette and reverse stockinette that are 2 rows wide.) Set this piece aside while you work another one.
Cuff
Knit across one cuff piece and then the other, dividing the stitches evenly among 4 double-pointed needles as you go. (You'll have 40 sts altogether.) Join for working in the round, being careful not to twist, and place a marker to indicate the beginning of the round. Then begin working the diamond pattern—follow the Cuff pattern through to the end, working each charted round 5 times around. Then work another set of welts as follows:
Knit 1 round. Purl 2 rounds. Knit 2 rounds. Purl 2 rounds. Knit 2 rounds. Purl 2 rounds. Knit 1 round.
Setting up the hand
Establish the pattern by working round 1 of the Hand pattern across the first 20 stitches of the round, then knit the remaining 20 stitches. Continue working the pattern on the back of the hand and knitting the palm stitches plain until you have completed round 7 of the pattern.
Thumb gusset
Work across the back of the hand in the established pattern. On the palm side, knit 1, place a marker, work round 1 of the Gusset pattern, place another marker, and knit to the end of the round.
Continue as established, working Hand pattern on the back of the hand and Gusset pattern on the palm side between the markers, until you have completed the Gusset pattern. On the following round, work across the back of the hand, k1, and place the gusset stitches on a holder, removing the markers on either side. Cast on 1 st over the gap using the backwards loop method. Knit to the end of the round.
Hand
Continue as established, working the Hand pattern over the back of the hand and knitting the palm stitches plain, until four full repeats of the Hand pattern have been worked.
Shaping the tip
Round 1: Work Tip pattern across back of hand, k1, ssk, knit to last 2 sts of round, k2tog.
Round 2: Work Tip pattern across back of hand, k to end.
Repeat these two rounds until round 10 of the Tip pattern has been completed. Then begin decreasing on every round, as follows: K1, ssk, k to last 2 sts from the back of the hand, k2tog; k1, ssk, k to last 2 sts of round, k2tog.
Repeat this decrease round until 8 sts remain, then work one final decrease round as follows: K1, sk2p, k1, sk2p.
Break the yarn and thread the end through the remaining stitches, then fasten it off.
Thumb
Transfer the held thumb stitches to double-pointed needles. Join yarn and work round 1 of Thumb pattern across the thumb sts. Pick up and knit 3 sts across the gap and join into the round. Place a marker here to indicate the beginning of the round. (You will have 16 sts altogether.)
Next round: Work the next round of the Thumb pattern, then knit to the end of the round.
Continue as established until Thumb pattern has been completed, then knit all sts until the thumb measures approximately 1/4" less than desired finished length.
Next round: (k2, k2tog) four times.
Next round: (k1, k2tog) four times.
Next round: k2tog four times.
Break the yarn and thread the end through the remaining stitches, then fasten it off.
Left mitten
The left mitten differs from the right only in the placement of the thumb gusset. Work Cuff edge, Cuff, and Setting up the hand as for the right mitten.
Thumb gusset
Work across the back of the hand in the established pattern. On the palm side, knit to last st in the round, place a marker, and work round 1 of the Gusset pattern.
Continue as established, working Hand pattern on the back of the hand and Gusset pattern on the palm side between the markers, until you have completed the Gusset pattern. On the following round, work across the back of the hand, k to the marker indicating the beginning of the gusset, and place the gusset stitches on a holder, removing the marker. Cast on 1 st over the gap using the backwards loop method.
The remainder of the left mitten is worked the same as the right mitten.
Finishing
Weave in all ends and block, by washing the mittens in warm water, patting them into shape, and leaving them to dry flat.
10 comments:
Those are beautiful!
It's been in the 80s F here, hard to think about mittens right now.
Beautiful! Thank you for sharing them with us!
Hi! I don't normally comment on blogs, but I had to make an exception here...
I was looking for a mitten pattern for a friend who loves to wear mittens and stumbled upon this pattern. They turned out so well, I made several pairs for Christmas presents! Everybody loves them! Now that the Holidays are over, I'm gonna make a pair for myself. I especially like how the extended cuffs cover the wrists from exposure.
So thank you, thank you! I don't know you, but I'm very grateful for your pattern...warm wishes for a Happy New Year!
Joanna
Thank you so much for sharing. I loved kintting these beautiful mittens!
Thank you very much for these mittens. It is winter here, so they will warm me twice- in the knitting and the wearing. They are beautiful. Love at first sight.
Thank you for this beautiful pattern!
Am just starting these mittens but they appear to be huge. I checked the tension and it is spot on. Do they shrink somewhat in blocking??
Thanks for this great pattern, Rebecca. I saw a sample of these mitts at The Loop in Halifax when I was home for a visit last year (I live in Vancouver now). I'm going to knit these mittens in my to-and-from travel time back to NS again next month. I'll think of Citadel Hill with every stitch. Last night, I cast on and worked the split cuff. As far as the travel knitting goes, I am now ready for take-off.
These instructions don’t make any sense !! A Victorian pattern has more clarity and details
Hi, I love your patterns! So very pretty. I am having difficulty with this mitten pattern, however. I don't understand the instructions in regard to the cuff edge and beginning of cuff. I know that there are two parts for the cuff edge, but not sure how they are knit together. I made one, and cut the yarn, and then made the next, and couldn't figure out a clean way to connect them. It's not something I have seen done in the past.
Thank you!
Post a Comment